 For beginners, mining for coins can be a tough undertaking. It is common for many miners to start with the Minergate console miner. This is so because it usually works very well with your CPU. It is however good to know that unless your interest is in ETC or ETH, your GPU is not really being properly utilized. Without proper understanding of the whole process, setting up CCMiner will not be possible. This is the process you need to follow.
It only makes sense to mine coins with a wallet already in place. This is basically a ready deposit location for the coins. This can’t be overlooked and therefore you need a ready wallet. If you were already on Minergate, it’s much easier. You can continue to deposit your coins straight into the existing account. With the wallet in place, you can proceed.
In this particular process, the miner needs to be very keen and pay attention to detail. We have a majority of CCMiner versions working with AMD and a number that works with NVidia. It is required that you get a version that is a match for your hardware. If you are running AMD, make sure that you get an AMD compatible version. This is very important. The download can be done from sites such as github.com. Download your CCMiner software.
After the download is complete, create a new folder in your preferred location. You can simply name it CCMiner. You will then move (cut and paste, drag and drop) your downloaded file (usually a Zip file) into the folder you created. For verification purposes, it is advisable to open the folder and confirm that all the contents have been successfully transferred.
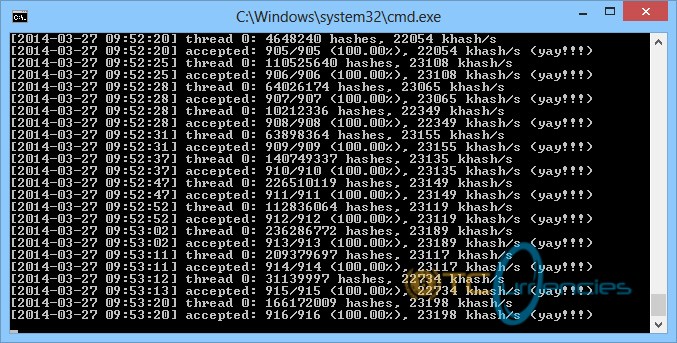
The following os an example of how you can then proceed to mine XMR with the Minergate pool.
After the transfer of the downloaded content, right click in the CCMiner folder you created and open a new text document (you will set this up using your wallet address).
You will enter this code:
ccminer –a scrypt –o <INSERT POOL ADDRESS HERE> –u <INSERT EMAIL or WALLET ADDRESS HERE> -p x
It is very important to get the format and syntax right, if not, it simply won’t work.
Your initial setup is now complete and you have to save it. You will now click “File”, then select “Save As…”.
For the XMR coin in this example, you will type XMR and add the extension .bat. For this to work you will have to change the Save As type, switching it to “All Files”.
Setup is complete. All you need to do now is close all windows you had opened so as to clear your workspace. Proceed to the CCMiner folder and run the XMR.bat and it will set everything in motion.
It is important to be patient and observe the setup details keenly for everything to work.
Stay Ahead of the Crypto Market
Get breaking Bitcoin, Ethereum & altcoin news the moment it happens. Free instant alerts.


